ページ

ラベル Core Image の投稿を表示しています。 すべての投稿を表示

2009年1月17日土曜日

チェックボードを描く

このエントリーをブックマークに追加 このエントリーを含むはてなブックマーク

チェックボードとは白と黒の四角を並べた模様。CoreImage にフィルタが用意されていて簡単に描ける。
http://www.blogger.com/img/blank.gif
サンプルソース:Checkboard-1.zip

実行結果:

http://www.blogger.com/img/blank.gif

フィルタはCICheckerboardGeneratorを使う。描画コードはこんな感じ。

- (void)drawRect:(NSRect)rect {

CIFilter *filter = [CIFilter filterWithName:@"CICheckerboardGenerator"];
[filter setDefaults];

[filter setValue:[NSNumber numberWithInt:10] forKey:@"inputWidth"];
[filter setValue:[CIColor colorWithRed:1.0 green:1.0 blue:1.0 alpha:0.5]
forKey:@"inputColor0"];
[filter setValue:[CIColor colorWithRed:0.1 green:0.1 blue:0.1 alpha:0.5]
forKey:@"inputColor1"];

CIImage *ciimage = [filter valueForKey:kCIOutputImageKey];

CIContext *context = [[NSGraphicsContext currentContext] CIContext];

[context drawImage:ciimage
atPoint:CGPointZero
fromRect:NSRectToCGRect([self bounds])];
}


とても簡単にチェック模様を描ける。


情報:

Using Core Image Filters
 Core Image フィルタのドキュメント

CICheckerboardGenerator
 CICheckboardGeneratorのリファレンス

Goofy behavior with CICheckerboardGenerator filter and transparency
 CICheckboardGeneratorを描画するサンプルが載っている。

- - - -
この模様を SimpleViewerの背景で使う。どんな感じになるだろうか。

2008年10月15日水曜日

波紋(その18)

このエントリーをブックマークに追加 このエントリーを含むはてなブックマーク

もう少し波がほしい。試しにフィルタを複数段重ねてみる。

こんな感じ。

 CIImage *output_image = [_filter valueForKey:kCIOutputImageKey];
[_filter2 setValue:output_image forKey:kCIInputImageKey];
output_image = [_filter2 valueForKey:kCIOutputImageKey];
[_filter3 setValue:output_image forKey:kCIInputImageKey];
output_image = [_filter3 valueForKey:kCIOutputImageKey];
    :


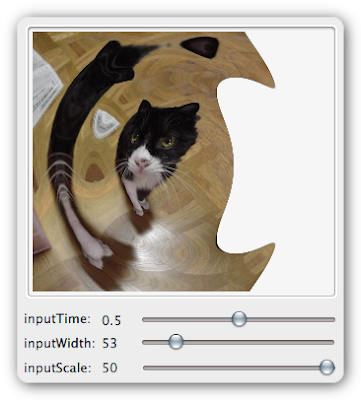
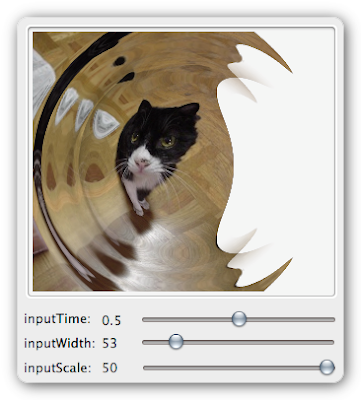
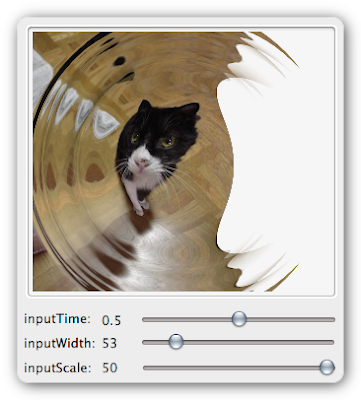
まずは1段の場合。


次に2段。徐々に波が多くなる。


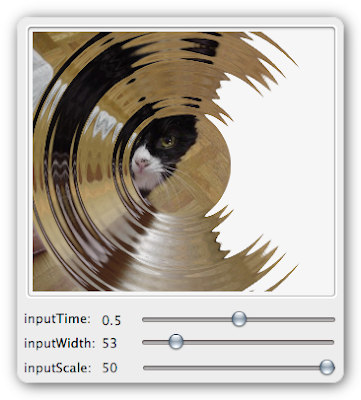
3段。いい感じだ。


ここまでは入力画像を、inputImageだけに当てていた。これをtargetImageにも適用してみる。


いっそう複雑な波が現れる。


視覚効果としては複数段重ねた方が見栄えがする。SimpleCapでも複数段を採用しよう。

2008年10月14日火曜日

波紋(その17)

このエントリーをブックマークに追加 このエントリーを含むはてなブックマーク

前回からの続き。

画像の反転(flip)は CGAffineTransform を使えば良い。
こんな感じ。

 CGAffineTransform transform;
transform = CGAffineTransformMakeTranslation(0.0, CGImageGetHeight(cgimage));
transform = CGAffineTransformScale(transform, 1.0, -1.0);
ciimage = [ciimage imageByApplyingTransform:transform];


元ネタはこちら。
Theocacao: Convert an NSImage to CIImage


続いて画像がおかしかった件。NSBitmapImageRepを経由せず、CIImage#initWithCGImage を使ったらこれは直った。
(前回)
NSBitmapImageRep *bitmap_rep = [[[NSBitmapImageRep alloc] initWithCGImage:cgimage] autorelease];
CIImage* ciimage = [[CIImage alloc] initWithBitmapImageRep:bitmap_rep];


(今回)
CIImage* ciimage = [[CIImage alloc] initWithCGImage:cgimage];


波紋出た。

2008年10月13日月曜日

波紋(その16)

このエントリーをブックマークに追加 このエントリーを含むはてなブックマーク

SimpleCapへ組み入れてみる。まずはウィンドウキャプチャで選択したウィンドウを波立たせてみよう。視覚効果が良さそうなら採用することにする。

見た目の確認が重要なので動作を最優先させる。そこで前回までのコードをコピーして動くものを組み立てる。
手始めに主要部分を Transaction という新クラスに記述する。

Transaction.h

@interface Transition : NSObject {

NSNumber *_inputTime;
NSNumber *_inputWidth;
NSNumber *_inputScale;
NSNumber *_framePerSec;
NSNumber *_totalSec;

CIFilter* _filter;
NSInteger _count;

NSView* _view;
BOOL _finished;
id _target;
}

@property (retain) NSNumber* inputTime;
@property (retain) NSNumber *inputWidth;
@property (retain) NSNumber *inputScale;
@property (retain) NSNumber *framePerSec;
@property (retain) NSNumber *totalSec;

- (id)initWithView:(NSView*)view;
- (void)draw;
- (void)startWithTarget:(id)target CGImage:(CGImageRef)cgimage;

@end


トランジションで使うパラメータをメンバ変数にもち、イニシャライザに、描画メソッド(draw)、トランジション開始のメソッドを用意した。これと SimpleCap既存のウィンドウキャプチャを組み合わせてみる。

実行してみる。


うーむ。波だっているようだが、色がおかしい上に上下反転(フリップ)している。
一筋縄ではいかないようだ。

2008年10月12日日曜日

波紋(その15)

このエントリーをブックマークに追加 このエントリーを含むはてなブックマーク

とりあえずサンプルを公開。

サンプルソース: RippleTransition-3.zip

環境マップ画像は透明なものを用意している。それなりに波紋に見える。

2008年10月11日土曜日

波紋(その14)

このエントリーをブックマークに追加 このエントリーを含むはてなブックマーク

NSView#dataWithPDFInsideRect の代わりに #bitmapImageRepForCachingDisplayInRect: を使うこともできる。

HDMT(July,2006)によれば「再現性、使用メモリ、パフォーマンスともに、かなりいい線いってる」とのこと。

旧コード
NSData* data = [_view2 dataWithPDFInsideRect:[_view2 bounds]];
NSImage *image1a = [[[NSImage alloc] initWithData:data] autorelease];

data = [image1a TIFFRepresentation];
NSBitmapImageRep* bitmap = [NSBitmapImageRep imageRepWithData:data];

これが下記の様になる。

新コード
NSBitmapImageRep* bitmap = [_view2 bitmapImageRepForCachingDisplayInRect:[_view2 bounds]];
[_view2 cacheDisplayInRect:[_view2 bounds] toBitmapImageRep:bitmap];


動作は問題ないようだ。コードもすっきりして良い。

NSView Class Reference - bitmapImageRepForCacingDisplayInRect:

2008年10月10日金曜日

波紋(その13)

このエントリーをブックマークに追加 このエントリーを含むはてなブックマーク

NSViewに描画した内容を CIImage へ変換し、トランジションをかける。

 NSData* data = [_view2 dataWithPDFInsideRect:[_view2 bounds]];
NSImage *image1a = [[[NSImage alloc] initWithData:data] autorelease];

data = [image1a TIFFRepresentation];
NSBitmapImageRep* bitmap = [NSBitmapImageRep imageRepWithData:data];
CIImage* image1b = [[CIImage alloc] initWithBitmapImageRep:bitmap];
CIImage* image2b = [[CIImage alloc] initWithBitmapImageRep:bitmap];
[_filter setValue:image1b forKey:kCIInputImageKey];
[_filter setValue:image2b forKey:kCIInputTargetImageKey];


_view2 がトランジションをかけたいビュー。これを dataWithPDFInsideRect: で一旦 NSData へ変換した後、NSImage、NSBitmapImageRepを経由して最後に CIImage を作成する。CIImage#initWithData はうまくいかなかった。

作ってみたのがこれ。


下の NSViewに描画し、これを CIImageへ変換し、上のエリアでトランジションをかけている。

2008年10月9日木曜日

波紋(その12)

このエントリーをブックマークに追加 このエントリーを含むはてなブックマーク

さてそろそろSimpleCapへの組み込みに入っていこう。使いどころはいくつかアイディアがあるが、いずれも NSView の描画内容に対して波紋のトランジションを適用することになる。トランジションへは CIImage で渡す必要がある為、NSViewの内容をなんらかの方法で変換してやる必要がある。

ネットで調べていると次のメソッドが使えそうな事がわかった。

NSView#dataWithPDFInsideRect:


戻り値は NSData になるので、これを CIImage#imageWithData: へ渡したらどうだろうか。

と、今日は時間切れ。
明日検証してみる。

2008年10月8日水曜日

波紋(その11)

このエントリーをブックマークに追加 このエントリーを含むはてなブックマーク

アニメーションさせてみる。初めの方では CoreAnnimationを使ったが、NSTimerを使い自前でタイミングを計る。

STARTボタンでタイマーを起動。

- (IBAction)start:(id)sender
{
_count = 0;
float interval = 1.0/[_framePerSec floatValue];
[NSTimer scheduledTimerWithTimeInterval:interval
target:self
selector:@selector(fire:)
userInfo:nil
repeats:YES];
}


タイマーが発火したら(前回までで用意した)トランジション画像描画メソッドを呼ぶ。
-(void)fire:(NSTimer*)theTimer
{
_count++;
float max_count = [_totalSec floatValue] * [_framePerSec floatValue];
if (_count > max_count) {
[theTimer invalidate];
}
_inputTime = [NSNumber numberWithFloat:(_count / max_count)];
[self redrawImage];
}


単に動かすだけでは調査にならないので、1秒当たりのフレーム数(_framePerSec)と、全体の時間(_totalSec)を調整できるようにした。

こんな感じ。


パラメータをいじりながらトランジションを確認していくと、だんだんいい感じになってきた。
今いい感じなのは上画像のパラメータセット(inputWith:102.0, inputScale:26.1, framePerSec: 20, totalSec: 2.0)。

後は環境マップのカスタマイズが必要。

- - - -
なお、今回もサンプルコード提供はありません。
実はトランジションで使っている環境マップ画像は
他サイトから勝手に借りてきて使っている為です。
環境マップが自前で用意できるようになったら公開します。

2008年10月7日火曜日

波紋(その10)

このエントリーをブックマークに追加 このエントリーを含むはてなブックマーク

いつのまにか Dashboard に CI Filter Browser なる Widgetが追加されている。


この中にパラメータの説明が日本語で書かれていた。

これによれば inputScale は、
「波紋が開始する突起(値が高い時)またはくぼみ(値が低い時)を決定するための値」

inputWithは
「波紋の幅」
とある。

2008年10月5日日曜日

波紋(その9)

このエントリーをブックマークに追加 このエントリーを含むはてなブックマーク

トランジションについてリファレンスを調べるといくつかパラメータがあることがわかる。
Core Image Filter Reference - CIRippleTransition

下記の2つはこのリファレンスを見て初めてわかった。

inputWidth
An NSNumber class whose attribute type is CIAttributeTypeDistance and whose display name is Width.

Default value: 100.00 Minimum: 1.00 Maximum: 0.00 Slider minimum: 10.00 Slider maximum: 300.00 Identity: 0.00

inputScale
An NSNumber class whose attribute type is CIAttributeTypeScalar and whose display name is Scale.

Default value: 50.00 Minimum: -50.00 Maximum: 0.00 Slider minimum: -50.00 Slider maximum: 50.00 Identity: 0.00


これを調整できるスライダを用意して動きを見てみよう。

最初はデフォルト値。


時間(inputTime)を進めて波紋が広がりかけた途中で止める。ここから他のパラメータをいじる。


inputWidth を減らす ( 100 ⇒ 23 )


inputWidth を増やす ( 100 ⇒ 226 )


inputScaleを減らす( 50 ⇒ 24 )


inputScaleを減らす( 50 ⇒ -1.40 )


今度は inputScaleを減らす( 50 ⇒ -50 )


パラメータをいじるとそれっぽくなってきた気がする。

波紋(その8)

このエントリーをブックマークに追加 このエントリーを含むはてなブックマーク

スライダでトランジションの状態を制御できるようにした。

NSNumber* _transition;

をスライダとバインドさせ、

[_filter setValue:_transition forKey:kCIInputTimeKey];

としてフィルタのタイムキーに設定するようにした。

kCIInputTimeKey の値は 0から 1の間の値を取る。これをスライダで制御してみる。

こんなかんじ。左の数字が kCIInputTimeKey の値。


- - - - -
いろいろ分かってきたが Dashboardのような波紋はまだほど遠い。Dashboardは環境マップに球ではなく四角を使っているようにみえる。また大きさも Widgetに合わせてその四隅で波紋がおきえいる。

2008年10月4日土曜日

波紋(その7)

このエントリーをブックマークに追加 このエントリーを含むはてなブックマーク

試行錯誤中。色の着いた四角をやめ、デジカメの画像に変えた。
それと CoreAnnimationをやめて自分でタイミング取りを行うようにコードを修正した(途中)。

タイミングは NSTimerなどを使って自分で行わなければならないが、とりあえずはその準備までできた。
コードはこんな感じ。

- (void)awakeFromNib
{
NSRect rect = [_view bounds];
NSURL* url0 = [NSURL fileURLWithPath:[[NSBundle mainBundle] pathForImageResource:@"shading"]];
NSURL* url1 = [NSURL fileURLWithPath:[[NSBundle mainBundle] pathForImageResource:@"buzz"]];
NSURL* url2 = [NSURL fileURLWithPath:[[NSBundle mainBundle] pathForImageResource:@"ocha"]];
CIImage* image0 = [CIImage imageWithContentsOfURL:url0];
CIImage* image1 = [CIImage imageWithContentsOfURL:url1];
CIImage* image2 = [CIImage imageWithContentsOfURL:url2];

CIFilter* filter = [CIFilter filterWithName:@"CIRippleTransition"];
[filter setDefaults];
[filter setValue:image0 forKey:kCIInputShadingImageKey];
[filter setValue:image1 forKey:kCIInputImageKey];
[filter setValue:image2 forKey:kCIInputTargetImageKey];

[filter setValue:[CIVector vectorWithX:NSMidX(rect) Y:NSMidY(rect)] forKey:kCIInputCenterKey];
[filter setValue:[CIVector vectorWithX:rect.origin.x Y:rect.origin.y Z:rect.size.width W:rect.size.height] forKey:kCIInputExtentKey];

[filter setValue:[NSNumber numberWithFloat:0.5f] forKey:kCIInputTimeKey];

CIImage *output_image = [filter valueForKey:kCIOutputImageKey];

NSImage* image = [[[NSImage alloc] initWithSize:NSMakeSize([output_image extent].size.width, [output_image extent].size.height)] autorelease];
[image lockFocus];
CGContextRef context = [[NSGraphicsContext currentContext] graphicsPort];
CIContext *ci_context = [CIContext contextWithCGContext:context options:nil];
[ci_context drawImage:output_image atPoint:CGPointZero fromRect:[output_image extent]];
[image unlockFocus];

[_view setImage:image];
}


前回までと違うのは CoreAnnimationを使うのをやめたこと。

こんな感じ。

2008年10月3日金曜日

波紋(その6)

このエントリーをブックマークに追加 このエントリーを含むはてなブックマーク

関連情報の紹介。

Core Graphics, meet Core Image - Transitions Demonstraction

ソースコード付きのデモ。


トランジションが一通り試せる。

2008年10月2日木曜日

波紋(その5)

このエントリーをブックマークに追加 このエントリーを含むはてなブックマーク

いよいよ波紋に挑戦。

CIFilterを作り CATransitionへ登録する。

 NSURL* url0 = [NSURL fileURLWithPath:[[NSBundle mainBundle] pathForImageResource:@"shading"]];
CIImage* image0 = [CIImage imageWithContentsOfURL:url0];

NSRect rect = [_view bounds];

CIFilter* filter = [CIFilter filterWithName:@"CIRippleTransition"];
[filter setDefaults];
[filter setValue:[CIVector vectorWithX:NSMidX(rect) Y:NSMidY(rect)] forKey:kCIInputCenterKey];
[filter setValue:[CIVector vectorWithX:rect.origin.x Y:rect.origin.y Z:rect.size.width W:rect.size.height] forKey:kCIInputExtentKey];
[filter setValue:image0 forKey:kCIInputShadingImageKey];


CATransition *transition = [CATransition animation];
[transition setFilter:filter];


トランジション前後の画像に加えて shadingImage が必要になる。これは以前紹介したページでは「環境マップ」と呼ばれていた。今回は透明な1枚の画像を用意して使ってみた。

実行してみる。まず初期画面。


トランジション実行。


おお前回と違って動きがある。
だけどなんか違うな。
イメージとしては Dashboardの Widgetの出現の時に出る波紋を想定していたが、ああはならない。
何が違うのだろうか。。


サンプル:RippleTransition-2.zip

2008年10月1日水曜日

波紋(その4)

このエントリーをブックマークに追加 このエントリーを含むはてなブックマーク

トランジションを試してみる。CocoaSlides のコードを参考に組んでみた。まずは CocoaSlides をまねて簡単なトランジションから挑戦。

試行錯誤の上、どうにか動いた。初期状態では黒い矩形が表示され、


ボタンを押すと、徐々に黄色に変化する。


サンプル:RippleTransition-1.zip


記述したクラスは AppControllerのみ。これと InterfaceBuilderで NSWindow上に NSViewを配置し、アウトレット _viewに接続しておく。

まず起動時に初期表示をさせる。

- (void)awakeFromNib
{
NSRect rect = [_view bounds];

CATransition *transition = [CATransition animation];
[transition setType:kCATransitionFade];
[transition setSubtype:kCATransitionFromLeft];
[transition setDuration:1.0];

[_view setAnimations:[NSDictionary dictionaryWithObject:transition forKey:@"subviews"]];

NSURL* url1 = [NSURL fileURLWithPath:[[NSBundle mainBundle] pathForImageResource:@"img1"]];
NSImageView* image_view1 = [[NSImageView alloc] initWithFrame:rect];
NSImage* image1 = [[NSImage alloc] initWithContentsOfURL:url1];
[image_view1 setImage:image1];
[[_view animator] addSubview:image_view1];

[_view setWantsLayer:YES];
}


トランジションのアニメーションを実現する為に、CATransitionを使う。CoreAnnimationが用意される前は自分で NSTimerを使う必要があったようだが、CATransitionを使えばそれは不要。CATransition にトランジションの種類(kCATransitionFade, kCATransitionFromLeft)や時間(setDuration:1.0)を設定し、_view にアニメーションとして登録する。@"subviews"はサブビューの切り替え時にトランジションアニメーションを適用するのに使うキーらしい。

続いて NSImageView を作り、黒矩形画像を貼付ける。最後に _viewのサブビューへ追加する。この時 #animatorを使う。

最後の #setWantsLayer:YES は重要で、これが無いとアニメーションが起らない。


続いてボタンが押された時の処理。
- (IBAction)start:(id)sender
{
NSRect rect = [_view bounds];
NSURL* url2 = [NSURL fileURLWithPath:[[NSBundle mainBundle] pathForImageResource:@"img2"]];
NSImage* image2 = [[NSImage alloc] initWithContentsOfURL:url2];
NSImageView* image_view2 = [[NSImageView alloc] initWithFrame:rect];
[image_view2 setImage:image2];
[[_view animator] replaceSubview:[[_view subviews] objectAtIndex:0] with:image_view2];
}


切り替え後の画像を用意し NSImageView へ貼付ける。これを #replaceSubview:with: で最初のビューと置き換える。これでトランジションアニメーションが動作する。


参考情報:
Re: CATransition on NSSplitView replaceSubview

Re: Sample project "Cocoa Sliders": some questions about API usage


シンプルだがトランジションが動作してちょっとうれしい。
次回はいよいよ波紋へ挑戦。

2008年9月30日火曜日

波紋(その3)

このエントリーをブックマークに追加 このエントリーを含むはてなブックマーク

CoocaSliedsのコードを読む。いくつかクラスがあるが、トランジション処理は SlideshowViewクラス に記述されている。
SlideshowViewはNSViewのサブクラスでメンバ変数には、表示中のイメージやトランジションのスタイル、マスク画像などが保持されている。

@interface SlideshowView : NSView
{
NSImageView *currentImageView; // an NSImageView that displays the current image, as a subview of the SlideshowView
int transitionStyle; // the style of transition to use; one of the SlideshowViewTransitionStyle values enumerated above
BOOL autoCyclesTransitionStyle; // set if we should automatically cycle our transitionStyle
CIImage *inputShadingImage; // an environment-map image that the transition filter may use in generating the transition effect
CIImage *inputMaskImage; // a mask image that the transition filter may use in generating the transition effect
}


まず awakeFromNib。ここではマスク画像など共通に使われる CIImageインスタンスを準備している。
- (void)awakeFromNib {
:
inputShadingImage = [[CIImage alloc] initWithBitmapImageRep:shadingBitmap];
:
inputMaskImage = [[CIImage alloc] initWithBitmapImageRep:maskBitmap];
}


続いて updateSubviewsTransition。ここはトランジションの切り替えで呼ばれる。
- (void)updateSubviewsTransition {
NSRect rect = [self bounds];
NSString *transitionType = nil;
CIFilter *transitionFilter = nil;
CIFilter *maskScalingFilter = nil;
CGRect maskExtent;

switch (transitionStyle) {
case SlideshowViewFadeTransitionStyle:
transitionType = kCATransitionFade;
break;
:
case SlideshowViewRippleTransitionStyle:
default:
transitionFilter = [[CIFilter filterWithName:@"CIRippleTransition"] retain];
[transitionFilter setDefaults];
[transitionFilter setValue:[CIVector vectorWithX:NSMidX(rect) Y:NSMidY(rect)] forKey:@"inputCenter"];
[transitionFilter setValue:[CIVector vectorWithX:rect.origin.x Y:rect.origin.y Z:rect.size.width W:rect.size.height] forKey:@"inputExtent"];
[transitionFilter setValue:inputShadingImage forKey:@"inputShadingImage"];
break;


CIRippleTransitionの設定が一通り行われる。続いて Core Annimation 設定。
    // Construct a new CATransition that describes the transition effect we want.
CATransition *transition = [CATransition animation];
if (transitionFilter) {
// We want to build a CIFilter-based CATransition. When an CATransition's "filter" property is set, the CATransition's "type" and "subtype" properties are ignored, so we don't need to bother setting them.
[transition setFilter:transitionFilter];
} else {
// We want to specify one of Core Animation's built-in transitions.
[transition setType:transitionType];
[transition setSubtype:kCATransitionFromLeft];
}

// Specify an explicit duration for the transition.
[transition setDuration:1.0];

// Associate the CATransition we've just built with the "subviews" key for this SlideshowView instance, so that when we swap ImageView instances in our -transitionToImage: method below (via -replaceSubview:with:).
[self setAnimations:[NSDictionary dictionaryWithObject:transition forKey:@"subviews"]];


この @"subviews"がよくわからない。


そして transitionToImage: 。このメソッドは SlidshowWindowController から呼出される。画像が次々と変わる時に transitionToImage: が呼出される。
- (void)transitionToImage:(NSImage *)newImage {
:
:
// Create a new NSImageView and swap it into the view in place of our previous NSImageView. This will trigger the transition animation we've wired up in -updateSubviewsTransition, which fires on changes in the "subviews" property.
NSImageView *newImageView = nil;
if (newImage) {
newImageView = [[NSImageView alloc] initWithFrame:[self bounds]];
[newImageView setImage:newImage];
[newImageView setAutoresizingMask:NSViewWidthSizable | NSViewHeightSizable];
}
if (currentImageView && newImageView) {
[[self animator] replaceSubview:currentImageView with:newImageView];
} else {
if (currentImageView) [[currentImageView animator] removeFromSuperview];
if (newImageView) [[self animator] addSubview:newImageView];
}
[currentImageView release];
currentImageView = newImageView;
}


渡された画像(NSImage)を表示する NSImageViewを作成し、トランジションをかける。っと見えるのだがイマイチ理解できない。

[[self animator] replaceSubview:currentImageView with:newImageView];

この辺りがトランジションのアニメーション処理の肝だろうか。

2008年9月29日月曜日

波紋(その2)

このエントリーをブックマークに追加 このエントリーを含むはてなブックマーク

ソースコードを読むつもりだったが時間がない。今日は関連情報の紹介だけ。

ADCのCore Image Programmingは日本語訳が用意されている。
Core Image プログラミングガイド

この中に波紋トランジションの記述がある。
トランジションフィルタ (Transition Filters) - 波紋トランジション


トランジションのコーディング方法も載っている。
トランジションエフェクトの使用

2008年9月28日日曜日

波紋(その1)

このエントリーをブックマークに追加 このエントリーを含むはてなブックマーク

今回から波紋に取り組む。ここでいう波紋とはCoreImageのトランジションの事。SimpleCapにちょっとした視覚的効果を加えてみたくて前から気になっていた。他の実装をやりつつ並行して検証を進めてみる。

まずは調査から。
木下さんが Core Image の記事をマイコミジャーナルに書いている。
Core Imageで体験 - Mac OS Xの高速画像処理
この中で波紋(Ripple)についても書かれておりサンプルコードも掲載されていた。
Rippleトランジションにもトライ

こちらを試してみる。


画像は表示されるのだが何も動かない。?


他も探してみる。ADCにサンプルが上がっていた。これも試してみよう。
CocoaSlides

ビルドして実行すると画像の一覧が表示される。


画像にチェックを付けてスライドショーを開始すると様々なトランジションを試すことができる。


いい感じだ。まずはこのソースコードを読んでみよう。