ページ

ラベル NSTableView の投稿を表示しています。 すべての投稿を表示

2010年4月19日月曜日

Application List (5) ドラッグ&ドロップ#2

このエントリーをブックマークに追加 このエントリーを含むはてなブックマーク

(前回)Cocoaの日々: Application List (4) ドラッグ&ドロップ

前回ドラッグ&ドロップができるようになったが描画がおかしかった。


コードを見直すと原因は描画方法にあることがわかった。
ApplicationCell.m

- (void)drawInteriorWithFrame:(NSRect)cellFrame inView:(NSView *)controlView
{
ApplicationEntry* entry = [self objectValue];

[controlView lockFocus];
NSPoint p1 = cellFrame.origin;
p1.x += 0;
p1.y += 0 + [entry.icon size].height;
[entry.icon compositeToPoint:p1 operation:NSCompositeSourceOver];
NSPoint p2 = cellFrame.origin;
p2.x += 20;
p2.y += 0;
NSDictionary* attrs = [NSDictionary dictionary];
[entry.name drawAtPoint:p2 withAttributes:attrs];
[controlView unlockFocus];
}

controlView を lockFocus して描いているのが問題。ドラッグ&ドロップ時にもセルの drawIneriorWithFrame:inView: が呼び出されるが、この時渡される controlView は NSTableView内のビュー。つまりドラッグ中のファイルを描画するビューではない。なのに、上記コードではドラッグ&ドロップ時の描画でも NSTableView内のビューに lockFocus をかけて描画しているためにおかしなことになった。

原因がわかれば対応は簡単。lockFocus を使わずに描画すればいい。


- (void)drawInteriorWithFrame:(NSRect)cellFrame inView:(NSView *)controlView
{
ApplicationEntry* entry = [self objectValue];
NSSize iconSize = [entry.icon size];
NSPoint p1 = cellFrame.origin;
if ([controlView isFlipped]) {
p1.y += iconSize.height;
}
[entry.icon compositeToPoint:p1 operation:NSCompositeSourceOver];
NSRect nameRect = cellFrame;
nameRect.origin.x += iconSize.width + 4.0;
nameRect.size.width -= iconSize.width;

NSDictionary* attrs = [NSDictionary dictionary];
[entry.name drawInRect:nameRect withAttributes:attrs];
}


さて実行してみよう。


出た。ちょっとうれしい。


ソースは GitHub からどうぞ。
AppList at 2010-04-20 from xcatsan's SampleCode - GitHub

- - - -
GUI はできたが並び替えの処理はまだ書いていない。次回はこれを実装しよう。

2010年4月17日土曜日

Application List (4) ドラッグ&ドロップ

このエントリーをブックマークに追加 このエントリーを含むはてなブックマーク

(前回)Cocoaの日々: Application List (3) アイコン表示

NSTableView 内でドラッグ&ドロップを使った並び替えの機能を実装する。

再びリファレンスを見て必要な実装を入れる。
Table View Programming Guide: Using Drag and Drop in Tables

1. registerForDraggedTypes: でサポートするデータタイプを定義
2. tableView:writeRowsWithIndexes:toPasteboard: でドラッグ開始
3. tableView:validateDrop:proposedRow:propsedDropOperation: でドロップ受け入れ準備
4. tableView:acceptDrop:row:dropOperation: でドロップ処理


まずデータタイプを定義。


#define AppListTableViewDataType @"AppListTableViewDataType"
 :


- (void)applicationDidFinishLaunching:(NSNotification *)aNotification {
[tableView_ registerForDraggedTypes:
[NSArray arrayWithObjects:
  NSFilenamesPboardType, AppListTableViewDataType, nil]];
            :
}


次にドラッグ開始時の処理。ドラッグ対象の行データを NSKeyedArchiver を使い  NSData に変換し、ペーストボードへ登録する。

- (BOOL)tableView:(NSTableView *)tv writeRowsWithIndexes:(NSIndexSet *)rowIndexes toPasteboard:(NSPasteboard*)pboard
{
    NSData *data = [NSKeyedArchiver archivedDataWithRootObject:rowIndexes];
    [pboard declareTypes:[NSArray arrayWithObject:AppListTableViewDataType] owner:self];
    [pboard setData:data forType:AppListTableViewDataType];
    return YES;
}


ドロップ受け入れ判定。NSTableView 内の場合、NSDragOperationMove (移動) とする。

- (NSDragOperation)tableView:(NSTableView *)aTableView validateDrop:(id < NSDraggingInfo >)info proposedRow:(NSInteger)row proposedDropOperation:(NSTableViewDropOperation)operation
{
[aTableView setDropRow:row dropOperation:NSTableViewDropAbove];
if ([info draggingSource] == tableView_) {
return NSDragOperationMove;
return NSDragOperationEvery;
}


最後はドロップ時の処理だが、とりあえずここまでで動かしてみる。

ん?ドラッグしても選択されるだけで、行をドラッグできない。なぜだろう。


いろいろ調べていると NSTableView はドラッグ時に -[NSCell hitTestForEvent:inRect:ofView:] を呼び出し、この結果でドラッグするかを判断しているらしい (v10.5から)。

情報源:

reordering table cells with 10.5 sdk | Cocoabuilder

上記に掲載されていた情報を引用すると:
NSTableView/NSOutlineView - Cell Hit Testing, Drag and Drop, and
Cell EditingNSTableView now uses the new NSCell hit testing API to
perform certain actions. Custom NSCell subclasses in applications
that link on or after Leopard should properly implement -
hitTestForEvent:inRect:ofView:; see NSCell.h for more information.

NSTableView performs hit testing in the cells to do the following
actions:
 - Drag and Drop: NSTableView calls hitTestForEvent:inRect:ofView in
 canDragRowsWithIndexes:atPoint. If the hit cell returns
 NSCellHitTrackableArea, the particular row will be tracked instead
 of dragged.
 - Cell Editing: When NSTableView recieves a mouse down, single-click
 editing of text (like Finder) will happen if there is only one row
 selected, and the cell returns NSCellHitEditableTextArea.

 See the DragNDropOutlineView demo application for an example of how
 to properly implement the NSCell methods.
※上記は developer.apple.com の releaesnotes に掲載されていたらしいが、みつからなかった。


関連情報:

NSCell Class Reference - Hit Testing

NSCell Class Reference - hitTestForEvent:inRect:ofView:

DragNDropOutlineView


そこで NSCell のサブクラスで hitTestForEvent:inRect:ofView: を実装してみた。といっても単純に NSCellHitContentArea を返すだけ。
ApplicationCell.m

- (NSUInteger)hitTestForEvent:(NSEvent *)event inRect:(NSRect)cellFrame ofView:(NSView *)controlView {
return NSCellHitContentArea;
}


これでどうだろう。
ドラッグできた。挿入位置に横線が入るようになった。ただ描画がおかしい。何故かドラッグしている行が一番上の行に描画されている。うーむ。

2010年4月14日水曜日

Application List (1) 雛形作成

このエントリーをブックマークに追加 このエントリーを含むはてなブックマーク

SimpleCap で要望が出ているプリファレンス内のヘルパーアプリ登録の UI改善に乗り出す。

現在はこんな感じ。

今見るとちょっとトホホ感がある。。

これを Mac用アプリでよくあるインターフェイスに変える。たとえば OS X のシステム環境設定にあるアカウントのログイン項目の UI:

[+] [ー] でアプリの増減が行える他、Finderからのドラッグ&ドロップでも登録ができる。SimpleCap の場合、並び替えもできた方がいいだろう。

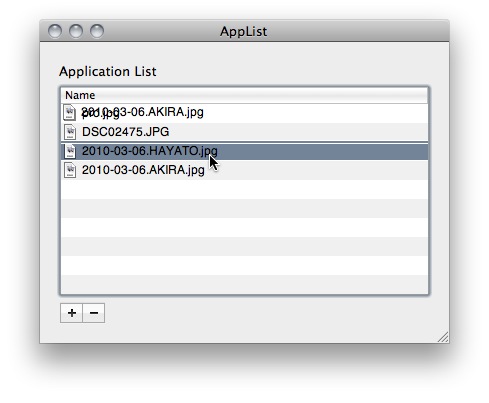
この UI の実装に取り組む。いつも通りサンプルを作って色々試した後、SimpleCap へ組み込むアプローチを取る。今回はドラッグ&ドロップできるところまで実装してみた。こんな感じ。
リスト表示には NSTableView を使い、ボタンは 23x20の NSButton を使い、 Imageに NSAddTemplate/NSRemoveTemplate、Bezel に Gradient を割り当てるとそれっぽいものができた。

アーキテクチャはいつもの通り Cocoa bindings を使った MVCを採用。今回モデルは NSMutableArray で管理し、これを Array Controller を通じて NSTableViewへ接続(bind)する。
表示一件分を表すモデル用のクラスとして ApplicationEntry を定義した。
ApplicationEntry.h

@interface ApplicationEntry : NSObject {

NSString* name;
NSString* path;
NSImage* icon;
}
@property (copy) NSString* name;
@property (copy) NSString* path;
@property (retain) NSImage* icon;
@end


これらを配列として管理する NSMutableArray は(サンプルなので)AppListAppDelegate の appList_ で管理している(InterfaceBuilder上の App List App...)。
AppListAppDelegate.h

@interface AppListAppDelegate : NSObject {
    NSWindow *window;
IBOutlet NSTableView* tableView_;
IBOutlet NSArrayController* arrayController_;
NSMutableArray* appList_;
}
@property (assign) IBOutlet NSWindow *window;
@property (retain) NSMutableArray* appList;


Interface Builder を使い、これらをつなげ(bind)て行く。

イメージ:
AppListAppDelegate.appList <-- Array Controller <-- NSTableColumn

NSTableColum の bindings の設定はこう。arrangedObjects は配列(appList)内のオブジェクト(ApplicationEntry)を表し、そのプロパティ name を表の表示データとして割り当てる。
ArrayController の bindings。AppListAppDelegate.appList へ bind してある。

MVC がつながった。
Model: appLisst
View: NSTableColumn
Controller: ArrayController

これだけで基本的な表示はおしまい。表示に関するコードを書かずにここまでできる。


次はドラッグ&ドロップの実装。NSTableView のドラッグ&ドロップ実装についてはリファレンスが用意されている。
Table View Programming Guide: Using Drag and Drop in Tables

ここに最小限の実装方法が載っている。
1. registerForDraggedTypes: でサポートするデータタイプを定義
2. tableView:writeRowsWithIndexes:toPasteboard: でドラッグ開始
3. tableView:validateDrop:proposedRow:propsedDropOperation: でドロップ受け入れ準備
4. tableView:acceptDrop:row:dropOperation: でドロップ処理

今回は、まずファインダからのドラッグ&ドロップだけを受け入れるので 1, 3, 4 を実装する。なお 3, 4 のメソッドは NSTableViewDataSource プロトコルで定義されていて NSTableView の DataSourceに対して呼び出しがかかる。この為、この DataSource で実装を書く必要がある。

今回は AppListAppDelegate を NSTableView の DataSource として Interface Builder で設定した。1, 3, 4 の実装は次の通り。

AppListAppDelegate.m

- (void)applicationDidFinishLaunching:(NSNotification *)aNotification {
// Insert code here to initialize your application 
[tableView_ registerForDraggedTypes:
[NSArray arrayWithObjects:NSFilenamesPboardType, nil]];
}

NSFilenamesPboardType でファイル名の配列を受け取るようにする。


- (NSDragOperation)tableView:(NSTableView*)tv
 validateDrop:(id <NSDraggingInfo>)info
 proposedRow:(NSInteger)row proposedDropOperation:(NSTableViewDropOperation)op
{
    return NSDragOperationEvery;
}

続いて 3.ドロップ受け入れ準備ではすべてのドラッグを受け入れることを返す。

最後に 4. ドロップ処理。

- (BOOL)tableView:(NSTableView *)aTableView
 acceptDrop:(id <NSDraggingInfo>)info
 row:(NSInteger)row dropOperation:(NSTableViewDropOperation)operation
{
    NSPasteboard* pboard = [info draggingPasteboard];
NSArray*filenames = [pboard propertyListForType:NSFilenamesPboardType];

for (NSString* filename in filenames) {
ApplicationEntry* entry = [[[ApplicationEntry alloc] init] autorelease];
entry.path = filename;
entry.name = [filename lastPathComponent];
[arrayController_ insertObject:entry atArrangedObjectIndex:row];
}

return YES;
}


NSPaseboard からドラッグ&ドロップされたファイル名配列を取得し、1つ1つを ApplicationEntry のインスタンスに割り当てる。そのインスタンスを ArrayController を通じて配列へ追加する。appList (NSMutableArray) へ直接追加しないのは、ArrayController を通した方が NSTableColumn の再描画が自動的に行われる為。appList 追加だけだと NSTableColumn は再描画されずドラッグ&ドロップしても何も表示が変わらない。

これで雛形がラフなものだができた。
コードを書く量がほんと少ない。bindings を使う度に毎回Cocoa のすごさを感じる。

- - - -
現状はファイル名を表示しているが、これをアイコン画像付きで、表示もアプリ名にする必要がある。次回取り組んでみよう。

2009年12月14日月曜日

NSTableView にカスタムセルを表示する (12) ボタンをつける〜NSTableViewのサブクラスでマウスイベント処理

このエントリーをブックマークに追加 このエントリーを含むはてなブックマーク

(前回)Cocoaの日々: NSTableView にカスタムセルを表示する (11) ボタンをつける〜NSCellのマウスイベントの扱い

NSTableView のサブクラスを作り、ここでマウスイベントを拾うことにした。


コード

移動中のマウスの動きもトラッキングしたい。Mac OS X v10.5 以降は NSTrackingArea が用意されているのでこれを使う。

(参考)Cocoaの日々: NSTrackingArea

CustomTableView.h

@interface CustomTableView : NSTableView {

NSTrackingArea* trackingArea;

}
@property (retain) NSTrackingArea* trackingArea;

@end

トラッキング対象となるエリア(NSTrackingArea) はリサイズなどで頻繁に変わる。更新の為には古いエリアを解放する必要があるのでメンバ変数でとっておく。


CustomTableView.m
NSTrackingArea 更新用のメソッドを用意し、これをリサイズ時に呼び出すようにする。

- (void)updateTrackingArea
{
if (self.trackingArea) {
 [self removeTrackingArea:self.trackingArea];
}
self.trackingArea = [[[NSTrackingArea alloc]
 initWithRect:[self frame]
  options:(NSTrackingMouseEnteredAndExited |
   NSTrackingMouseMoved |
  NSTrackingActiveAlways )
  owner:self
 userInfo:nil] autorelease];
 [self addTrackingArea:self.trackingArea];
}


一旦 NSTrackingArea が設定できれば mouseEntered: や mouseMoved: などが呼び出される。これらを実装しておく。今回は検証目的なので NSLog() を入れておいた。


実行結果

実行してみよう。


マウスをテーブルの上に持っていくとイベントが取れているのがわかる。


トラッキング範囲

なお NSTableView は NSScrollView の中に入っているため、トラッキングエリアに -[NSTableView frame] を指定すると NSTableViewの外まで対象となってしまう(理由:NSTableViewの大きさ > NSScrollViewの大きさ)。サンプルアプリの場合、ウィンドウ下の余白までが入ってしまう。これを防ぐ為に -[NSView visibleRect] を使うことも考えたが、今度は NSTableView でスクロールするとその範囲が古くなってしまうため意図通りに動かない(スクロールで新しく現れた範囲がトラッキングの対象にならない)。スクロールの度に NSTrackingArea を更新するのも気が乗らない。

今回は -[NSTableView frame] で隠れた部分も含め NSTableView 全体を範囲としておき、イベント処理時に見える範囲(visibleRect)内かどうかのチェックを行うようにした。

- (BOOL)isVisible:(NSEvent*)theEvent
{
 NSPoint p = [self convertPointFromBase:[theEvent locationInWindow]];
 return NSPointInRect(p, [self visibleRect]);
}


- (void)mouseEntered:(NSEvent *)theEvent
{
if ([self isVisible:theEvent]) {
NSLog(@"mouseEntered:");
}
[super mouseEntered:theEvent];
}


なお NSTrackingArea で大きな範囲をとっても、ウィンドウの外はトラッキングの対象にはならない。


ソースコード

GitHub からどうぞ

CustomCellWithCoredata at 20091214 from xcatsan's SampleCode - GitHub

2009年11月24日火曜日

NSTableView にカスタムビューを表示する(調査中)

このエントリーをブックマークに追加 このエントリーを含むはてなブックマーク

NSTableView にカスタムビューを表示する方法を調査中。

NSTableView with custom cells - Stack Overflow

-tableView:dataCellForTableColumn:row: を使う方法が示唆されていた。

-tableView:dataCellForTableColumn:row: は NSTableViewDelegate プロトコルで定義されている。

Mac Dev Center: NSTableViewDelegate Protocol Reference

このプロトコルは Mac OS X 10.6 から新設されたもので、そのほとんどのメソッドは従来は Informal Protocol として用意されていたもの(なので 10.5 まででも基本的に使える)。

Mac Dev Center: NSTableView Class Reference


ちょっとサンプルを組んでみよう。
(続く)