ページ

2008年9月30日火曜日

波紋(その3)

このエントリーをブックマークに追加 このエントリーを含むはてなブックマーク

CoocaSliedsのコードを読む。いくつかクラスがあるが、トランジション処理は SlideshowViewクラス に記述されている。
SlideshowViewはNSViewのサブクラスでメンバ変数には、表示中のイメージやトランジションのスタイル、マスク画像などが保持されている。

@interface SlideshowView : NSView
{
NSImageView *currentImageView; // an NSImageView that displays the current image, as a subview of the SlideshowView
int transitionStyle; // the style of transition to use; one of the SlideshowViewTransitionStyle values enumerated above
BOOL autoCyclesTransitionStyle; // set if we should automatically cycle our transitionStyle
CIImage *inputShadingImage; // an environment-map image that the transition filter may use in generating the transition effect
CIImage *inputMaskImage; // a mask image that the transition filter may use in generating the transition effect
}


まず awakeFromNib。ここではマスク画像など共通に使われる CIImageインスタンスを準備している。
- (void)awakeFromNib {
:
inputShadingImage = [[CIImage alloc] initWithBitmapImageRep:shadingBitmap];
:
inputMaskImage = [[CIImage alloc] initWithBitmapImageRep:maskBitmap];
}


続いて updateSubviewsTransition。ここはトランジションの切り替えで呼ばれる。
- (void)updateSubviewsTransition {
NSRect rect = [self bounds];
NSString *transitionType = nil;
CIFilter *transitionFilter = nil;
CIFilter *maskScalingFilter = nil;
CGRect maskExtent;

switch (transitionStyle) {
case SlideshowViewFadeTransitionStyle:
transitionType = kCATransitionFade;
break;
:
case SlideshowViewRippleTransitionStyle:
default:
transitionFilter = [[CIFilter filterWithName:@"CIRippleTransition"] retain];
[transitionFilter setDefaults];
[transitionFilter setValue:[CIVector vectorWithX:NSMidX(rect) Y:NSMidY(rect)] forKey:@"inputCenter"];
[transitionFilter setValue:[CIVector vectorWithX:rect.origin.x Y:rect.origin.y Z:rect.size.width W:rect.size.height] forKey:@"inputExtent"];
[transitionFilter setValue:inputShadingImage forKey:@"inputShadingImage"];
break;


CIRippleTransitionの設定が一通り行われる。続いて Core Annimation 設定。
    // Construct a new CATransition that describes the transition effect we want.
CATransition *transition = [CATransition animation];
if (transitionFilter) {
// We want to build a CIFilter-based CATransition. When an CATransition's "filter" property is set, the CATransition's "type" and "subtype" properties are ignored, so we don't need to bother setting them.
[transition setFilter:transitionFilter];
} else {
// We want to specify one of Core Animation's built-in transitions.
[transition setType:transitionType];
[transition setSubtype:kCATransitionFromLeft];
}

// Specify an explicit duration for the transition.
[transition setDuration:1.0];

// Associate the CATransition we've just built with the "subviews" key for this SlideshowView instance, so that when we swap ImageView instances in our -transitionToImage: method below (via -replaceSubview:with:).
[self setAnimations:[NSDictionary dictionaryWithObject:transition forKey:@"subviews"]];


この @"subviews"がよくわからない。


そして transitionToImage: 。このメソッドは SlidshowWindowController から呼出される。画像が次々と変わる時に transitionToImage: が呼出される。
- (void)transitionToImage:(NSImage *)newImage {
:
:
// Create a new NSImageView and swap it into the view in place of our previous NSImageView. This will trigger the transition animation we've wired up in -updateSubviewsTransition, which fires on changes in the "subviews" property.
NSImageView *newImageView = nil;
if (newImage) {
newImageView = [[NSImageView alloc] initWithFrame:[self bounds]];
[newImageView setImage:newImage];
[newImageView setAutoresizingMask:NSViewWidthSizable | NSViewHeightSizable];
}
if (currentImageView && newImageView) {
[[self animator] replaceSubview:currentImageView with:newImageView];
} else {
if (currentImageView) [[currentImageView animator] removeFromSuperview];
if (newImageView) [[self animator] addSubview:newImageView];
}
[currentImageView release];
currentImageView = newImageView;
}


渡された画像(NSImage)を表示する NSImageViewを作成し、トランジションをかける。っと見えるのだがイマイチ理解できない。

[[self animator] replaceSubview:currentImageView with:newImageView];

この辺りがトランジションのアニメーション処理の肝だろうか。

2008年9月29日月曜日

波紋(その2)

このエントリーをブックマークに追加 このエントリーを含むはてなブックマーク

ソースコードを読むつもりだったが時間がない。今日は関連情報の紹介だけ。

ADCのCore Image Programmingは日本語訳が用意されている。
Core Image プログラミングガイド

この中に波紋トランジションの記述がある。
トランジションフィルタ (Transition Filters) - 波紋トランジション


トランジションのコーディング方法も載っている。
トランジションエフェクトの使用

2008年9月28日日曜日

波紋(その1)

このエントリーをブックマークに追加 このエントリーを含むはてなブックマーク

今回から波紋に取り組む。ここでいう波紋とはCoreImageのトランジションの事。SimpleCapにちょっとした視覚的効果を加えてみたくて前から気になっていた。他の実装をやりつつ並行して検証を進めてみる。

まずは調査から。
木下さんが Core Image の記事をマイコミジャーナルに書いている。
Core Imageで体験 - Mac OS Xの高速画像処理
この中で波紋(Ripple)についても書かれておりサンプルコードも掲載されていた。
Rippleトランジションにもトライ

こちらを試してみる。


画像は表示されるのだが何も動かない。?


他も探してみる。ADCにサンプルが上がっていた。これも試してみよう。
CocoaSlides

ビルドして実行すると画像の一覧が表示される。


画像にチェックを付けてスライドショーを開始すると様々なトランジションを試すことができる。


いい感じだ。まずはこのソースコードを読んでみよう。

2008年9月27日土曜日

環境設定(17)

このエントリーをブックマークに追加 このエントリーを含むはてなブックマーク

今回はキャプチャに効果音を付ける。Cocoaには NSSound が用意されていて、これを使うとたった2行で音が出せる。

 NSSound *sound = [NSSound soundNamed:@"Submarine"];
[sound play];


今回はシステムに付属している /System/Library/Sounds/Submarine.aiff を鳴らしてみた。


音の有無が制御できるよう新たに環境設定に "Play Sounds"を加えた。


- - - -
コードは簡単にできたが、肝心の音が用意できない。
シャッター音はどこで手に入るのだろうか?
自分で作らないとダメだろうか。

2008年9月26日金曜日

環境設定(16)

このエントリーをブックマークに追加 このエントリーを含むはてなブックマーク

角丸+影+白枠のケースを例にして処理を追ってみる。

まずCGWindowListCreateImage( ) でキャプチャ画像を用意し、NSImageに変換しておく。


次に最終画像を書き込む NSImage *output_imageを用意する。大きさは、影と白枠が付くので元画像よりも大きくなる。※説明しやすいように黄色で表現してある。


白枠用のパス NSBezierPath* frame_path を用意する。白枠が付かない場合も画像と同じ大きさで作っておく。影を描く時にこれを使う。なお今回は角が丸いので #bezierPathWithRoundedRect:xRadius:yRadius: を使う(角が丸くない場合は #bezierPathWithRect: を使う)。


output_imageのフォーカスをロックした上で、frame_pathを使って白く塗りつぶす。

 [output_image lockFocus];
[[NSColor whiteColor] set];
[frame_path fill];


塗りつぶす前に NSShadow*shadow を作り #set しておく。そうすると上記の様に塗りつぶした領域の下に影が付く。

最後に src_image を上に描く。


画像の角を丸く切り抜くには、角丸のパスを作り、これを使って描画時にクリッピングする。こんな感じ。


できあがり。


角丸、影、白枠の有無によって上記の大きさや、処理の有無を調整すればいろいろな組み合わせで加工できる。

ソースコードは SimpleCap の一部として後日公開予定。

2008年9月25日木曜日

環境設定(15)

このエントリーをブックマークに追加 このエントリーを含むはてなブックマーク

実装してみた。

まずノーマル。


影付き。


白枠付き。


影+角丸。


白枠+影+角丸


解説はまた明日。

2008年9月24日水曜日

環境設定(14)

このエントリーをブックマークに追加 このエントリーを含むはてなブックマーク

プレビューができたので、実際の実装に入る。手を入れるのは範囲選択処理を司る SelectionHandler。キャプチャ画像を作成するメソッドが1つにまとめられているので、ここに手を入れれば良い。

SelectionHandler.m

- (CGImageRef)capture
{
CGImageRef cgimage = CGWindowListCreateImage(NSRectToCGRect(_rect),
kCGWindowListOptionOnScreenBelowWindow,
[_capture_controller windowID],
kCGWindowImageDefault);}
return cgimage;


他のHandlerと同様、最後のファイル出力メソッドへは CGImage で渡している。一方、画像を加工するには NSImageの方が少なくとも自分にとっては都合が良い。そこで一旦、NSImageへ変換してそれを加工した後、最後にまた CGImageへ変換して返す事にする。そうすればこのメソッド以外に書き直す必要は無い。

こんな感じ。
- (CGImageRef)capture
{
// (1) キャプチャ
CGImageRef cgimage = CGWindowListCreateImage(NSRectToCGRect(_rect),
kCGWindowListOptionOnScreenBelowWindow,
[_capture_controller windowID],
kCGWindowImageDefault);}

// (2) NSImage へ変換
NSBitmapImageRep *bitmap = [[[NSBitmapImageRep alloc] initWithCGImage:cgimage] autorelease];
NSImage* src_image = [[[NSImage alloc] init] autorelease];
[src_image addRepresentation:bitmap];

// (3) 加工
    :
    :
NSImage* output_iamge = 加工 ( src_image );

// (4) CGImageへ戻す
NSBitmapImageRep *out_bitmap = [NSBitmapImageRep imageRepWithData:[output_image TIFFRepresentation]];
CGImageRef out_image = [out_bitmap CGImage];


// (5) 結果を返す
return cgimage;
}


変換のオーバーヘッドはあるが、これで扱いやすくなった。実際の加工処理を入れていこう。

2008年9月23日火曜日

環境設定(13)

このエントリーをブックマークに追加 このエントリーを含むはてなブックマーク

プレビューを実装してみた。

最初はこう。


白枠をつける。


それに影を追加。


最後に角丸。


白枠を外す。組み合わせは自由。


プレビューはこれでいいだろう。実際の機能を実装しよう。

2008年9月22日月曜日

環境設定(12)

このエントリーをブックマークに追加 このエントリーを含むはてなブックマーク

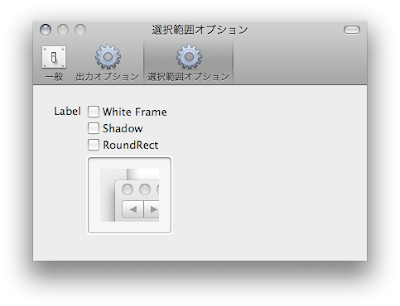
環境設定は続く。次は選択範囲のオプション設定。

範囲選択で切り出した画像を出力時に加工する。白枠(White Frame)、影(Shadow)、角丸(RoundRect)の3つを用意する。


今回はプレビューの作成から入ろう。


おおっと。今日は時間切れでここまで。続きは明日。

2008年9月21日日曜日

環境設定(11)

このエントリーをブックマークに追加 このエントリーを含むはてなブックマーク

プレビューの続き。


まずはマウスカーソルの表示。これは NSCursorから画像を取得して重ね合わせれば良い。

 [frame_image lockFocus];
   :
if ([[UserDefaults valueForKey:UDKEY_MOUSE_CURSOR] boolValue]) {
NSPoint cursor_point = NSMakePoint(50, 60);
[[[NSCursor arrowCursor] image] compositeToPoint:cursor_point operation:NSCompositeSourceOver];
}


マウスカーソルを描きたい NSViewのフォーカスをロックし(lockFocus)、いつものごとく#compositeToPoint:operation:で合成する。

するとこうなる。


次は影付け。NSShadow を使えば簡単にできる。
[NSGraphicsContext saveGraphicsState];          // (*0)

// Window Shadow
if ([[UserDefaults valueForKey:UDKEY_WINDOW_SHADOW] boolValue]) {

NSShadow* shadow = [[NSShadow alloc] init]; // (*1)
[shadow setShadowOffset:NSMakeSize(10.0, -10.0)];
[shadow setShadowBlurRadius:10.0];
[shadow setShadowColor:[[NSColor blackColor] colorWithAlphaComponent:0.3]];
[shadow set]; // (*2)

}
// Compsite Image
[example_image compositeToPoint:draw_point operation:NSCompositeSourceOver]; // (*3)

[NSGraphicsContext restoreGraphicsState]; // (*4)


NSShadowのインスタンスを作成した後(*1)、set メッセージを投げてやる(*2)。するとこの後の描画には影が自動的に付く様になる。サンプル画像を描画する(*3)。ポイントはNSGraphicsContextの保持(*0)と復帰(*4)を前後に挟むこと。これらが無いと、この後の描画全てに影が付いてしまうことになる。

結果はこんな感じ。


なおサンプルの画像は次のように左上に余白があるもの使う。これは余白が無いと右上と左下の影が切れてしまう為。


最後に背景。下のような画像を用意して合成するだけ。


if ([[UserDefaults valueForKey:UDKEY_BACKGROUND] boolValue]) {
[[NSImage imageNamed:@"output_background"] compositeToPoint:NSZeroPoint operation:NSCompositeSourceOver];
}


するとこうなる。


いい感じだ。

2008年9月20日土曜日

環境設定(10)

このエントリーをブックマークに追加 このエントリーを含むはてなブックマーク

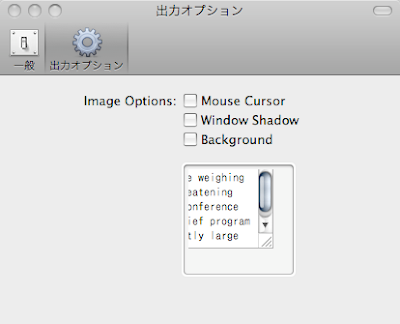
今回はプレビューを作る。前回までで、影、マウスカーソル、背景とオプション設定ができるようになったが、これを直感的に分かる様に例を表示したい(プレビュー)。

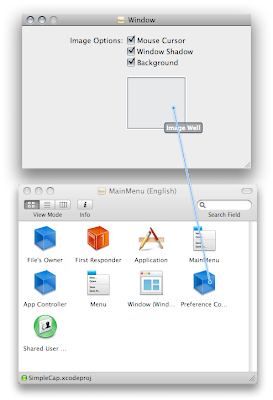
まずは InterfaceBuilderで NSImageView を配置する。


PreferenceContoller にアウトレットを用意し、配置したNSImageViewへ接続する。

PreferenceController.h

@interface PreferenceController : NSObject {
   :
IBOutlet NSImageView* _image_view;
   :
}


つづいて例で使う画像を用意する。これは手作業で加工して(地道に?)作る。ファイル名は output_example.tiff


最後にコーディング。まずは表示確認を目的として描画してみる。下記のメソッドを呼出して描画する。

PreferenceController.m
- (void)drawOutputExample
{
NSSize frame_size = NSMakeSize(120, 120);
NSImage* frame_image = [[NSImage alloc] initWithSize:frame_size];
NSImage* example_image = [NSImage imageNamed:@"output_example"];
NSPoint draw_point = NSMakePoint(0, frame_size.height - [example_image size].height);

[frame_image lockFocus];
[example_image compositeToPoint:draw_point operation:NSCompositeSourceOver];
[frame_image unlockFocus];
[_image_view setImage:frame_image];
}


120x120ピクセルの NSImageを作り、そこへ output_example.tiff を合成し NSImageViewで表示する。


実行するとこんな感じ。


- - - -
この画像に影を付けたり、マウスカーソルを重ねたりしてプレビューの役割をまかせる。

2008年9月18日木曜日

環境設定(9)

このエントリーをブックマークに追加 このエントリーを含むはてなブックマーク

前回の続き。

SimpleCapではキャプチャ処理をハンドラの基底クラスにあたる HandlerBase で行っている。

※クラス構成は過去のブログをどうぞ:SimpleCap (2) - 基本機能実装


具体的には各ハンドラはキャプチャ実行時に、Windowクラスのリスト(CGWindowIDを含む)と矩形領域(CGRect)を HandlerBase#cgimageWihWindowList:cgrectへ渡して、CGImageを取得する。

HandlerBase.m

- (CGImageRef)cgimageWithWindowList:(NSArray*)list cgrect:(CGRect)cgrect
{
   :


この中で画像キャプチャを行う CGWindowListCreateImageFromArray( ) を呼出している。つまりここを押さえれば出力の画像を自由にできる。今回はここに背景画像の合成処理を加えた。といって背景(壁紙)の CGWindowID を CGWindowListCreateImageFromArray( )に渡す配列に加えるだけで簡単にできる。

   :
BOOL is_background = [[UserDefaults valueForKey:UDKEY_BACKGROUND] boolValue];   // (1)
   :
if (is_background) {
windowIDs[widx++] = [Window desktopWindowID];      // (2)
}
   :
CFArrayRef windowIDsArray = CFArrayCreate(kCFAllocatorDefault, (const void**)windowIDs, widx, NULL);
CGImageRef cgimage = CGWindowListCreateImageFromArray(cgrect, windowIDsArray, option);
free(windowIDs);


UserDefaultsから設定を取り出し、それによって背景のCGWindowIDを Window#desktopWindowID から取得して、CGWindowListCreateImageFromArray( )へ渡す配列へ加えている(1)(2)。

背景のCGWindowIDは WindowList(自作ソフト)を使って調べると"DeskTop"という名前がついていて、"Window Server"という名前のプロセスによって作成されているのが分かる。


Window#desktopWindowID は安易にこの名前を使って CGWindowIDを決定する(もっといい方法があれば是非教えて下さい)。

Window.m
static _desktop_windowID = -1;
+ (CGWindowID)desktopWindowID
{
if (_desktop_windowID != -1) {
return _desktop_windowID;
}

CFArrayRef ar = CGWindowListCopyWindowInfo(kCGWindowListOptionOnScreenOnly, kCGNullWindowID);
CFDictionaryRef window;
CFIndex i;

_desktop_windowID = kCGNullWindowID;
for (i=0; i < CFArrayGetCount(ar); i++) {
window = CFArrayGetValueAtIndex(ar, i);
NSString* name = (NSString*)CFDictionaryGetValue(window, kCGWindowName);
NSString* owner_name = (NSString*)CFDictionaryGetValue(window, kCGWindowOwnerName);
if ([name isEqualToString:@"Desktop"] && [owner_name isEqualToString:@"Window Server"]) {
CFNumberGetValue(CFDictionaryGetValue(window, kCGWindowNumber),
kCGWindowIDCFNumberType, &_desktop_windowID);
break;
}
}
return _desktop_windowID;
}


これで、できあがり。

これが。


こうなる。


- - - -
ほ。今日もブログはぎりぎり間に合った。
最近は仕事が忙しくてかなわない。

環境設定(8)

このエントリーをブックマークに追加 このエントリーを含むはてなブックマーク

今回は "Background"オプション。背景(壁紙)をキャプチャに含める。
これは初実装。

いつもはこんな感じ。


オプションをONにするとこうなる。


メニューもこの通り。


時間が無いので解説はまた明日。

おお、なんとか今日に間に合った?

2008年9月17日水曜日

環境設定(7)

このエントリーをブックマークに追加 このエントリーを含むはてなブックマーク

次はマウスカーソル。


マウスカーソルはファイルへ書き出す前の最後の段階で合成している。ここを抑えればいいだろう。その責務は CaputreControllerクラスが担っている。

CaptureContoller.m

- (void)saveImage:(CGImageRef)cgimage withMouseCursorInRect:(NSRect)rect
{
:
int is_mouse_cursor = [[UserDefaults valueForKey:UDKEY_MOUSE_CURSOR] intValue];

if (is_mouse_cursor && ...
// マウスカーソル画像の合成処理
:


マウスカーソルあり。


マウスカーソルなし。


よし。

2008年9月16日火曜日

環境設定(6)

このエントリーをブックマークに追加 このエントリーを含むはてなブックマーク

今度はツールバーを増やし出力オプションを追加する。


まずはウィンドウの影の制御(Winow Shadow)から。

これは SimpleCap内部で使っている CGWindowListCreateImageFromArray( ) 関数の第三引数で制御できる。

CGWindow.h

enum {
kCGWindowImageDefault = 0, /* Default behavior: If a rect of CGRectNull is used
* bounds computation includes the framing effects, such as a shadow. */
kCGWindowImageBoundsIgnoreFraming = (1 << 0), /* If a rect of CGRectNull is used,
* ignore framing effects for bounds computation */
kCGWindowImageShouldBeOpaque = (1 << 1), /* The captured image should be
* opaque. Empty areas are white */
kCGWindowImageOnlyShadows = (1 << 2)
};


オプションの種類は全部で4つ。挙動は以前ブログで紹介したことがある。
CGWindowListCreateImage のオプション

今回はこのうちの kCGWindowImageDefault(影あり)とkCGWindowImageBoundsIgnoreFraming(影無し)を使おう。以前リファクタリングした時に CGWindowListCreateImageFromArray( ) の利用はハンドラのベースクラス HandlerBase#cgimageWithWindowList:cgrect へまとめてある。ここだけを変更すれば良い。

HandlerBase.m
- (CGImageRef)cgimageWithWindowList:(NSArray*)list cgrect:(CGRect)cgrect
{ CGWindowImageOption option;

if ([[UserDefaults valueForKey:UDKEY_WINDOW_SHADOW] intValue] == 1) {
option = kCGWindowImageDefault;
} else {
option = kCGWindowImageBoundsIgnoreFraming;
}
:
CGImageRef cgimage = CGWindowListCreateImageFromArray(cgrect, windowIDsArray, option);
:


実行してみる。

影あり


影無し


良さそうだ、

2008年9月15日月曜日

環境設定(5)

このエントリーをブックマークに追加 このエントリーを含むはてなブックマーク

次はファイルの保管場所。


"Choose..."を押すとダイアログが開いて保存先を選べる。


ダイアログのオープンには NSPanel#runModalForDirectory:file:types: を使う。

PreferenceController.m

- (void)chooseImageLocation:(id)sender
{
NSOpenPanel *openPanel = [NSOpenPanel openPanel];
[openPanel setCanChooseFiles:NO];
[openPanel setCanChooseDirectories:YES];
[openPanel setCanCreateDirectories:YES];
[openPanel setAllowsMultipleSelection:NO];

int result = [openPanel runModalForDirectory:NSHomeDirectory()
file:nil
types:nil];

if (result == NSOKButton) {
NSArray* filenames = [openPanel filenames];
if ([filenames count] > 0) {
NSString* new_path = [filenames objectAtIndex:0];
[UserDefaults setValue:new_path forKey:UDKEY_IMAGE_LOCATION];
}
}
}


上記の UserDefaults は NSDefaultsController を初期化したりするラッパー。パネルでフォルダが選択されたらユーザでフォルトへ書き込む。

NSDefaultsController 経由の書き込みは #values で取り出したオブジェクトに対して #setValue:forKey: を投げる。するとNSDefaultsControllerとバインドされたビュー上のオブジェクトも値が更新される。

2008年9月14日日曜日

環境設定(4)

このエントリーをブックマークに追加 このエントリーを含むはてなブックマーク

試しに一つ設定を追加してみる。


InterfaceBuilderへラベルとポップアップボタンを配置し、NSUserDefaultsControllerへ接続するたけでユーザインターフェイスはできあがり。

コードでは SimpleCap内でファイル保存を担当する FileManagerクラスに手を入れる。

FileManager.m

- (void)saveImage:(NSBitmapImageRep*)bitmap_rep
{
int image_format_tag = [[[[NSUserDefaultsController
sharedUserDefaultsController] values]
valueForKey:@"image_format"] intValue];
NSData* data;

switch (image_format_tag) {
case 1:
// GIF
data = [bitmap_rep representationUsingType:NSGIFFileType
properties:[NSDictionary dictionary]];
break;

case 2:
// JPEG
data = [bitmap_rep representationUsingType:NSJPEGFileType
properties:[NSDictionary dictionary]];
break;

case 0:
defaults:
// PNG
data = [bitmap_rep representationUsingType:NSPNGFileType
properties:[NSDictionary dictionary]];
break;

}
[data writeToFile:[self nextFilename] atomically:YES];
}


"image_format" という名前で NSUserDefaultsから値を取り出して利用する。


PNG形式。ブログの画像では分かりづらいが影の部分はアルファチャネルが保存されいる。


JPEG形式。背景が白色となっている。


GIF形式。影の部分が真っ黒になってしまった。


- - - -
GIFの問題はあるが、環境設定はこんな感じで使っていけることがわかった。
どしどし追加していこう。