NSViewController は Mac OS X 10.5 から導入されたクラスで名前の通りビューを対象としたコントローラ。テーブルビューのカスタマイズを調査する過程で気になったので少し調べてみた。
Mac Dev Center: NSViewController Class Reference
NSViewController
リファレンスから説明を転載する。
An NSViewController object manages a view, typically loaded from a nib file.
This management includes:
- Memory management of top-level objects similar to that of the
NSWindowController class, taking the same care to prevent reference cycles when controls are bound to the nib file's owner that NSWindowController began taking in Mac OS v 10.4.
- Declaring a generic
representedObject property, to make it easy to establish bindings in the nib to an object that isn't yet known at nib-loading time or readily available to the code that's doing the nib loading.
- Implementing the key-value binding
NSEditor informal protocol, so that applications usingNSViewController can easily make bound controls in the views commit or discard the changes the user is making.
ポイントは3つある。一つ目は NSWindowController 同様にメモリ管理する役割。ただ見るところ管理というほど大げさではなく、実際はモデルとビューのリファレンスを持っているということか。
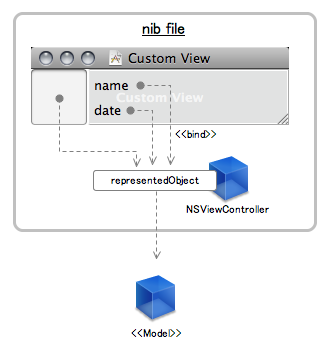
2つ目はそのリファレンスの一つでモデルへの参照 representedObject を持っているということ。これは後ほど紹介するが Interface Builder で Cocoa bindings を使う時のパスの一部として使える。
3つ目は非形式プロトコル NSEditor を実装していること。
使った事が無いので推測になるが、変更点の確定や破棄(アンドゥ)が行えるようだ。
NSViewController が無くてもアプリは作れるが、MVC で構成する際にこれまでの経験からよく使われるだろう機能をコントローラーとしてまとめたクラスだといえる。
ADC提供のサンプル
NSViewController を使ったサンプルが ADCからいくつか提供されている。
プルダウンから NSViewController を切り替えるサンプル。それぞれのタイプ(Image, Table, Video, iSight Camera)毎に NSViewController およびそれを含む Nibファイルが用意されている。
メインは NSCollectionView。
自作サンプル
NSViewContorller をつかったサンプルプログラムを試しに作ってみる。
まずは Cocoa Application のプロジェクトを作り、毎度おなじみの AppController クラスを用意しておく。
AppController.h
@class ImageFile;
@interface AppController : NSObject {
IBOutlet NSView* view;
IBOutlet NSViewController* viewController;
ImageFile* imageFile;
}
@end
ImageFile は表示内容を保持するモデルクラス。
ImageFile.h
@interface ImageFile : NSObject {
NSImage* image;
NSString* name;
NSDate* date;
}
@property (retain, nonatomic) NSImage* image;
@property (retain, nonatomic) NSString* name;
@property (retain, nonatomic) NSDate* date;
@end
次にInterface Builder を立ち上げる。メインウィンドウには Custom View を一つ貼付けておく。
それとは別に Custom View を一つ用意する。ここへ NSImageView と2つのラベルを貼付けておく。
さらに View Controller と AppController もインスタンス化し、必要なアウトレットを接続しておく。
構成はこんな感じになる。
View Controller の接続状況。
Custome View の画像とラベルの Bindings を設定する。Bind先を View Controller として、Model Key Path に representedObject.[ImageFileのプロパティ名]としておく。これだけで View Controller を介してモデルの内容が表示される。
NSViewController の representedObject とモデル(ImageFile)との紐付けおよび、メインウィンドウへのビューの追加は AppController で行う。
AppController.m
#import "AppController.h"
#import "ImageFile.h"
@implementation AppController
- (void)awakeFromNib
{
imageFile = [[ImageFile alloc] init];
imageFile.image = [NSImage imageNamed:@"sample"];
imageFile.name = @"sample.jpg";
imageFile.date = [NSDate date];
[viewController setRepresentedObject:imageFile];
[view addSubview:[viewController view]];
}
@end
テスト用にモデルのインスタンスを一つ用意した。画像はあらかじめ Resources フォルダへコピーしてある。
さて動かしてみよう。
出た。
...検証目的なのでこれといって役に立つものではない。
ソースコード
GitHubよりどうぞ。
ViewControllerStudy at 20091119 from xcatsan's SampleCode - GitHub
NSCollectionView
NSCollectionView も NSViewController を使った例の一つといえる。NSCollectionView で使う NSCollectionViewItem はずばり NSViewController から派生している。
Mac Dev Center: Collection View Programming Guide: Quick Start for Collection Views
Mac Dev Center: NSCollectionView Class Reference
Mac Dev Center: NSCollectionViewItem Class Reference
過去に NSCollectionView の解説をしているので興味の有る方はどうぞ。
Cocoaの日々: NSCollectionView
クラス相関図(もどき)
study01-2.png (image)