(連載中)Cocoaの日々: Application List
前回ドラッグ&ドロップができるようになった。ただ見た目だけでドロップしても何も起こらない。今回はドロップした時にモデル内でデータを移動して、最終的に並び替えができるようにする。
モデルは NSMutableArray で管理している。ドロップ時にこの配列内で並び替えをやればいいだろう。
まずドロップ時の処理から。-[NSTableViewDataSource tableView:acceptDrop:row:dropOperation:] を実装する。
AppListAppDelegate.m
- (BOOL)tableView:(NSTableView *)aTableView acceptDrop:(id <NSDraggingInfo>)info
row:(NSInteger)row dropOperation:(NSTableViewDropOperation)operation
{
NSPasteboard* pboard = [info draggingPasteboard];
NSArray* pboardTypes = [pboard types];
if ([pboardTypes containsObject:AppListTableViewDataType]) {
NSData* data = [pboard dataForType:AppListTableViewDataType];
NSIndexSet *rowIndexes = [NSKeyedUnarchiver unarchiveObjectWithData:data];
NSArray* srcArray = [appList_ objectsAtIndexes:rowIndexes];
NSUInteger srcCount = [srcArray count];
if ([rowIndexes firstIndex] < row) {
row = row - srcCount;
}
NSIndexSet* newIndexes = [NSIndexSet indexSetWithIndexesInRange:NSMakeRange(row, srcCount)];
[appList_ removeObjectsAtIndexes:rowIndexes];
[appList_ insertObjects:srcArray atIndexes:newIndexes];
[arrayController_ rearrangeObjects];
return YES;
} else if ([pboardTypes containsObject:NSFilenamesPboardType]) {
NSArray*filenames = [pboard propertyListForType:NSFilenamesPboardType];
for (NSString* filename in filenames) {
ApplicationEntry* entry = [[[ApplicationEntry alloc] initWithPath:filename] autorelease];
[appList_ insertObject:entry atIndex:row];
}
[arrayController_ rearrangeObjects];
return YES;
} else {
return NO;
}
}
ドラッグは、ファインダからのケース(NSFilenamesPboardType)と、テーブル内からの移動のケース(AppListTableViewDataType: オリジナルのタイプ)の2種類がある。今回は後者の方の実装。
ドラッグ開始時に、ドラッグ対象の行情報(NSIndexSet)がペーストボードに入れられるので、これを取り出して処理する。
NSData* data = [pboard dataForType:AppListTableViewDataType];
NSIndexSet *rowIndexes = [NSKeyedUnarchiver unarchiveObjectWithData:data];
移動処理は単純に元のデータを削除し、これらを新たな位置へ挿入する。削除後に挿入位置が変わるケースがあるのでその調整が入れてある。
if ([rowIndexes firstIndex] < row) {
row = row - srcCount;
}
NSMutableArray を操作した後、-[NSArrayController rearrangeObjects] を呼び出して、NSTableViewへ表示を反映させる。
[appList_ removeObjectsAtIndexes:rowIndexes];
[appList_ insertObjects:srcArray atIndexes:newIndexes];
[arrayController_ rearrangeObjects];
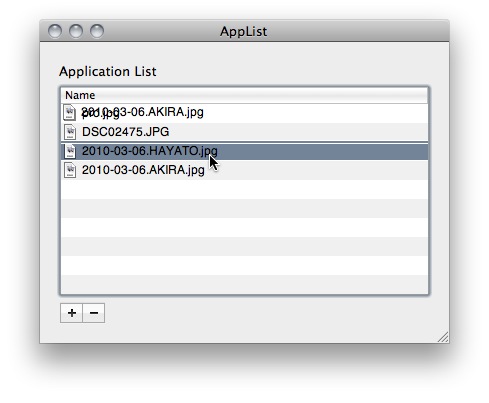
動かしてみよう。
ドラッグして..
ドロップする。
移動できた。
ソースは GitHub からどうぞ。
AppList at 2010-04-20c from xcatsan's SampleCode - GitHub
- - - -
あとは + ー ボタンの実装ぐらいか。